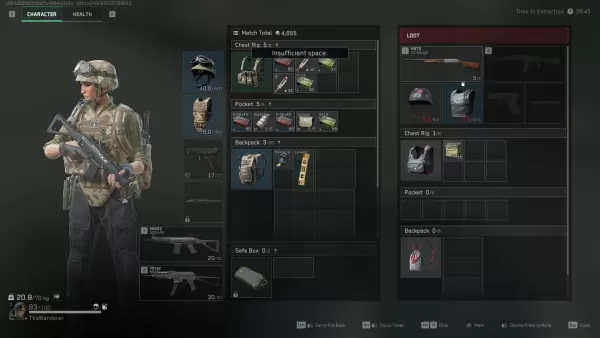
Delta Force's Operations mode, also known as Hazard Operations or Extraction mode, is the pulsating core of the game’s high-stakes action. Whether you're familiar with it as "Operations" or simply "raiding," the objective remains consistent—parachute into the fray, secure valuable gear, and make a successful escape before hostile players or AI adversaries take you down. A key element to remember is the high stakes: every piece of equipment you carry into the mission is at risk, and death means losing it all.
This comprehensive guide delves deeper than mere survival tactics. You'll uncover the full spectrum of how Operations mode functions from the moment you enter until you exit, including strategies for pacing your run, managing your gear effectively, and making strategic decisions that accrue value over time. If your focus is solely on survival strategies for Operations mode, our dedicated blog post on the subject is a must-read.
Whether you're going solo or teaming up with a squad, understanding the mechanics is crucial for playing smarter, not harder.
What Operations Mode Actually Is
Delta Force’s Operations mode is a dynamic PvPvE sandbox where no two matches are alike. You, along with up to two other players, drop into a live map teeming with AI soldiers, loot locations, and rival teams. The mission is clear: gather as much loot as possible and safely extract it before you're eliminated.
Unlike traditional shooter modes, there's no score to chase. The loot you manage to extract becomes a permanent addition to your inventory outside the raid. However, the flip side is harsh: if you're taken out, you lose everything you're carrying, except for items secured in your Safe Box. This risk-and-reward dynamic intensifies the thrill of Operations mode, even if you're just snagging medical supplies and making a quiet getaway.
Loadout Planning and Inventory Control
Your journey to success begins before you even set foot on the map—it starts with crafting the optimal loadout for the mission at hand. Each match requires an entry fee, making your loadout decisions critical. The essentials—helmet, armor, chest rig, and backpack—are mandatory. You can't deploy without them. Beyond these basics, your choices will shape your gameplay strategy.

Extraction points are typically fixed, but some maps feature dynamic elements such as elevators or checkpoints controlled by enemies. Plan your exit strategy in advance before you venture too deep into looting.
Loot Smarter, Not Harder
In Operations mode, every item has a sell value, but not all are worth the risk. In the early stages, prioritize collecting healing items, weapon attachments, and rare electronics. These items are compact, valuable, and easily stored in your Safe Box if necessary.
Heavy weapons and armor might be tempting, but they can slow you down and occupy valuable space. Carry them only if you're certain of extraction or if you're close to an exit with nothing to lose.
A smart tip for newcomers is to steer clear of high-traffic loot areas during the initial minutes. Allow other teams to engage in combat, then swoop in to claim the spoils. If you're playing solo, focus on looting around the map's periphery and circle back later. You'll be amazed at the valuable items left behind after a heated skirmish.
Picking the Right Operative
The Operative you choose shapes your approach in Operations mode. Not all are suited for stealth or intensive looting, so select one that aligns with your objectives.
Luna and Hackclaw excel in intelligence gathering and mobility. Luna can tag enemies and disrupt enemy advances with her shock arrows, while Hackclaw can move silently and execute silent takedowns with her knife. Stinger, with his healing kit, is ideal for team missions, especially when supporting more aggressive teammates.
Avoid Operatives with conspicuous or flashy abilities unless your strategy involves direct confrontation. Characters like D-Wolf are entertaining but tend to draw unwanted attention in a mode where staying under the radar often yields better outcomes.
Fight When It Matters
In Operations mode, choosing your battles wisely is more crucial than emerging victorious from every fight. While PvP engagements can yield gear and XP, they also consume time and attract attention. Engage only when you're prepared or when it's your best course of action.
In a firefight, keep moving and aim for quick resolutions. Leverage your Operatives' abilities to gain an edge—Luna's detection arrow can reveal players behind cover, and Stinger's smokes can provide cover for healing or escape.
Remember, you can loot fallen foes later. If two teams are clashing, hang back and let them wear each other down. The risky tactic of third-partying can be one of the most effective ways to acquire gear without having to outgun everyone yourself.
Making the Most of Each Match
Every raid offers an opportunity to accumulate value, hone your skills, or gain new insights. Don't dwell on a bad run; instead, use it to refine your strategy for the next one.
Conserve your credits during losing streaks and play more strategically when you're on a winning run. Upgrade your Safe Box early, experiment with different Operative configurations, and explore maps to discover the most lucrative loot routes.
Over time, your focus will shift from mere survival to optimization. That's when Operations mode truly becomes engaging.
Delta Force’s Operations mode transcends simple loot-and-run mechanics. It's a strategic game of risk management, planning, and making astute decisions. Construct your loadout with purpose, loot judiciously, and discern when to fight or retreat. Every setback is merely a part of the journey that makes your first major victory all the more rewarding.
For the best gaming experience, consider playing Delta Force on a PC with BlueStacks. You'll benefit from faster load times, precise controls, and easier inventory management. It's the optimal way to stay competitive as you master the game's intricacies.


